How to White Balance
with filters
The original Magic and Greenwater Magic filters are designed to work with the camera’s manual white balance setting (WB) and it is important to set the WB underwater. The Auto-Magic filter is designed to work with the camera’s AUTO WB, so you don’t need to do anything if you are shallow. However, many users prefer to manually white balance this filter too.
Before diving with a Magic Filter set the camera to Custom/Preset/Manual WB and familiarise yourself with method for calibrating it (also remember to switch back to normal WB after you have finished with the filter!). Many newer compact cameras can be set to one button white balance - where the customisable function button is given this role.
Generally you need to recalibrate the WB when you change depth by a couple of metres. In most cases you can set the WB using the subject (usually by taking a picture of it), but ensure that the subject fills most of the frame. Open water will NOT produce a suitable white balance (being completely blue it will cause the WB to be too red!). It is also important to ensure that area you choose to white balance on is illuminated by direct sunlight.
Common problems for not getting a good white balance are setting it into the light, setting it on a shady area, or most often not having the correct exposure when try into set.
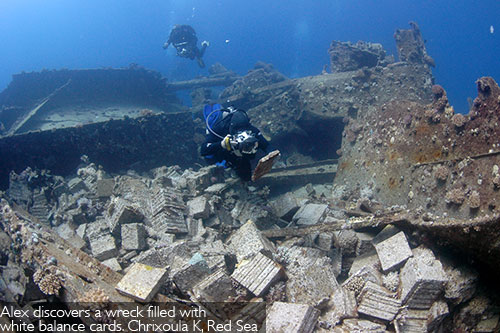
You can also set the WB off a neutral white slate or grey card ensuring it fills most of the frame. This is useful if the subject is skittish or you are diving away from the reef out in the blue.

The underwater world is filled with many neutrally coloured objects ideal for setting WB. Š PR
Once you are used to it, setting the
WB is very quick and just takes a
few seconds. The video below is an excert from shooting Magic and shows
me setting the white balance underwand and shooting some pictures on a
Red Sea Reef:
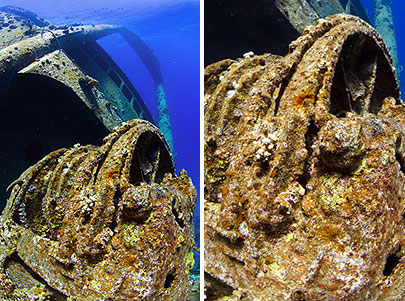
Calibrating the white balance is really worthwhile makes a big difference to your images in camera. To take the image below (left) I first set the WB by ensuring that the frame was filled with the winch in the foreground (right), once I had recorded this value I then recomposed and took the shot I wanted

Image taken at 10m on Giannis D (ŠAM)
Obviously if the most amazing subject in world swims past you should definitely shoot first and worry about the WB later! If you are shooting RAW it will not massivelt affect the quality and look of the end result to adjust the WB in the RAW converter. For the purists, not getting the white balance close to correct in camera does harm image quality, even in RAW, which is most noticeable as increased colour noise and loss of highlight detail in the final, corrected file.
Even if you have set the WB underwater you may wish to fine-tune the WB in the RAW converter. That said not all RAW converters are created equal and sometimes cameras can produce a white balance value that your particular RAW Converter cannot match.
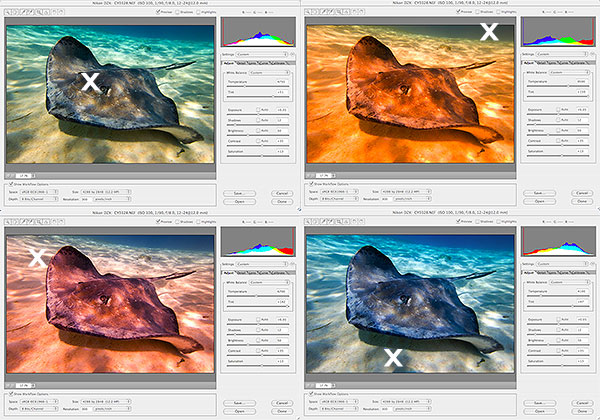
In Adobe Camera Raw (Photoshop plug-in) you can use the dropper to set the WB. The example below shows four views of the same image in ACR, with the dropper used in 4 different places, marked by the X.

Four views of the same image with different WB settings selected using the dropper
in Adobe Camera Raw. The position of the dropper is shown with X in each case.
Original image taken at 3.5m with Magic Filter (ŠAM).
The best WB values can usually be obtained by clicking the dropper on a neutral coloured area of the foreground, as in the bottom right image in the set above. If you subject is in open water against a blue background, you will get the best WB by clicking on a neutrally coloured area of the subject that is at the shallowest point.
For the best results avoid clicking on the background or open water sections of the image as these will make the final image too red. Also avoid setting the WB by clicking on strong hues in the image, like for example a red soft coral.
The original Magic and Greenwater Magic filters are designed to work with the camera’s manual white balance setting (WB) and it is important to set the WB underwater. The Auto-Magic filter is designed to work with the camera’s AUTO WB, so you don’t need to do anything if you are shallow. However, many users prefer to manually white balance this filter too.
Before diving with a Magic Filter set the camera to Custom/Preset/Manual WB and familiarise yourself with method for calibrating it (also remember to switch back to normal WB after you have finished with the filter!). Many newer compact cameras can be set to one button white balance - where the customisable function button is given this role.
Generally you need to recalibrate the WB when you change depth by a couple of metres. In most cases you can set the WB using the subject (usually by taking a picture of it), but ensure that the subject fills most of the frame. Open water will NOT produce a suitable white balance (being completely blue it will cause the WB to be too red!). It is also important to ensure that area you choose to white balance on is illuminated by direct sunlight.
Common problems for not getting a good white balance are setting it into the light, setting it on a shady area, or most often not having the correct exposure when try into set.
You can also set the WB off a neutral white slate or grey card ensuring it fills most of the frame. This is useful if the subject is skittish or you are diving away from the reef out in the blue.

The underwater world is filled with many neutrally coloured objects ideal for setting WB. Š PR
Calibrating the white balance is really worthwhile makes a big difference to your images in camera. To take the image below (left) I first set the WB by ensuring that the frame was filled with the winch in the foreground (right), once I had recorded this value I then recomposed and took the shot I wanted

Image taken at 10m on Giannis D (ŠAM)
Obviously if the most amazing subject in world swims past you should definitely shoot first and worry about the WB later! If you are shooting RAW it will not massivelt affect the quality and look of the end result to adjust the WB in the RAW converter. For the purists, not getting the white balance close to correct in camera does harm image quality, even in RAW, which is most noticeable as increased colour noise and loss of highlight detail in the final, corrected file.
Even if you have set the WB underwater you may wish to fine-tune the WB in the RAW converter. That said not all RAW converters are created equal and sometimes cameras can produce a white balance value that your particular RAW Converter cannot match.
In Adobe Camera Raw (Photoshop plug-in) you can use the dropper to set the WB. The example below shows four views of the same image in ACR, with the dropper used in 4 different places, marked by the X.

Four views of the same image with different WB settings selected using the dropper
in Adobe Camera Raw. The position of the dropper is shown with X in each case.
Original image taken at 3.5m with Magic Filter (ŠAM).
The best WB values can usually be obtained by clicking the dropper on a neutral coloured area of the foreground, as in the bottom right image in the set above. If you subject is in open water against a blue background, you will get the best WB by clicking on a neutrally coloured area of the subject that is at the shallowest point.
For the best results avoid clicking on the background or open water sections of the image as these will make the final image too red. Also avoid setting the WB by clicking on strong hues in the image, like for example a red soft coral.