
More info on the GreenWater Magic
filter
The GreenWater Magic filter is available in 6 different sizes of optical quality polyester gels. All our GreenWater filters are pre-packed as singles or three packs, and we recommend 3 packs for travelling photographers in case you damage or loose a filter in the field.
This video of the Exploding Lobster was shot by Peter Rowlands with the GreenWater Magic filter.
How to shoot with the filters?
The GreenWater Magic filter is our most technical product and requires more application from the user than our other filters to get the best results. The detailed advice below should give you a better idea of what to expect from this filter. Ambient light photography requires a different approach to shooting with strobes, and even experienced photographers may take several dives to get used to it. The most important point is to shoot with the ambient light to get even lighting and good colours.
Manual White Balance
Setting your camera’s white balance (WB) manually is a crucial part of the technique for shooting with Magic filters, and is particularly important for the Greenwater Magic. The filters are specifically designed to work with the characteristics of your camera’s WB. You should fully familiarise yourself with the technique for manually setting WB, so it becomes second nature during a dive.
We strongly recommend that you set the WB for each subject that you photograph with the Greenwater Magic, and at least each time your change depth by more than a metre. Generally you can set the WB on the subject, making sure that you fill the frame with a fully illuminated and neutral coloured area (avoiding strongly coloured marine life or open water). If you want you can use a grey card or white slate (depending on your camera), but we have found these unnecessary.
Depth Range
The Greenwater Magic filter is effective over a wide depth range from 5m (15ft) down to 25m (80ft). If you plan to shoot only above 5m (15ft) then we recommend not using the filter and only using manual WB as outlined above. Below this depth manual WB alone may work, but the combination of the filter and manual WB will give superior results as it effects the balance of colours collected by the camera’s sensor, rather than merely how these data are processed.
Reading the Light
The most important factor for successful filter shots is using the ambient light to illuminate your subject, First look up towards the surface and note then direction of the sunlight. Then position yourself so that the light comes from behind you and fully illuminates the subject. A slightly downward camera angle is also useful to ensure even illumination. In green waters ambient light can be very diffuse, often giving you more flexibility of shooting angles.
Subject Selection
The slow shutter speeds required for ambient light photography in green waters make certain subjects more suitable for this technique that others. Fast moving marine life, such as fish and seals, are less suitable. But the technique is excellent for photos of wrecks, divers, scenery, and slow moving marine life.
RAW + JPG
During the development of the Greenwater Magic filter we have noticed that RAW and JPG files (taken simultaneously) can look a little different and sometimes the JPG can look more pleasing. Surprisingly we have not been able to exactly match the look of the JPG files using Adobe Camera Raw to adjust the RAW files. We attribute this difference to additional processing applied to the JPG files in the camera. We can match them using the fine control in Photoshop, and we expect that we could in the manufacturer’s RAW converters.
Anyway, we recommend that you shoot RAW + JPG with the Greenwater Magic filter so that you can use the JPG files should you prefer them.
Noise Reduction
High ISO shooting in low light will produce noise in your digital images. So it is worth switching on any in-camera noise reduction, or applying noise reduction in the RAW Converter or by using a Photoshop plug-in like Noise Ninja.
Fluorescence
Filter photography highlights the natural fluorescence of marine life. Fluorescence occurs when a subject emits light at a different wavelength to the light shining on it. Underwater green and blue light excites fluorescence in a variety of marine life from corals to algae, which emit orange, yellow, green and red light. Normally this light is hard to see because it is swamped by the ambient light reflect by the subject. However, filters act as a barrier to the ambient light revealing this natural fluorescence. In green waters you may see algae appearing red and cup corals fluorescing many colours.
Post Processing
The Greenwater Magic filter produces very pleasing colours direct from the camera and you will see these underwater while you are diving. The filter does tend to remove some green from the water too, producing more blue-ish water colours. Some photographers prefer this look, but if you don’t you can easily adjust the water colour in Photoshop using the Selective Color tool. You can green up the water colour by adding cyan and yellow, and removing magenta from the cyan, blue and neutral channels. We have not made this adjustment to the images you see in this brochure and on the website, but we mention it so you know it is possible.
Fitting filters
Magic filters were originally designed as rear mounted filters because many DSLR wide angle lenses, popular in underwater photography, have specific filter slots on them for gel filters. A few wide-angle zooms do not have these filter holders so we also produce the Magic Filter as a 77mm diameter front of lens filter. The Magic M77 is also large enough to be cut by the user for a variety of other lenses. There are more details on which filter is the right one for your lens on the buy page. For compact cameras we supply the filter in 50x50mm squares, so that the user can cut the filter to fit their camera. For some cameras a single sheet may provide enough material for four or more filters.
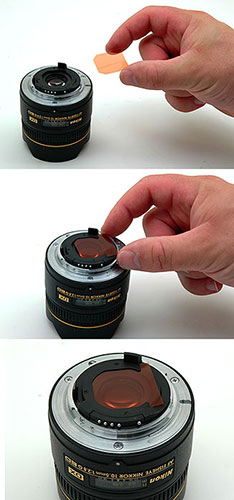
When fitting filters only handle them by the edges to avoid getting fingerprints on the centre (see below, left). Rear filter holders are designed for gel filters and will hold the filter securely in place. The Nikon 16mm lens is unusual and the Magic 16N should be placed in the removable bayonet filter holder, on the back of the lens (below, right, note the filters in these photos are the original Magic).
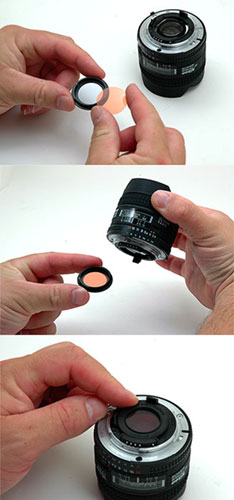
The Magic 77 fits on the front of the lens. This filter should be placed between your dioptre lens and the front element of the lens (below left). If you do not use a dioptre then the Magic 77 can be held in place with a standard UV filter. Alternately you can mount the dioptre is an empty filter mount (below, right).

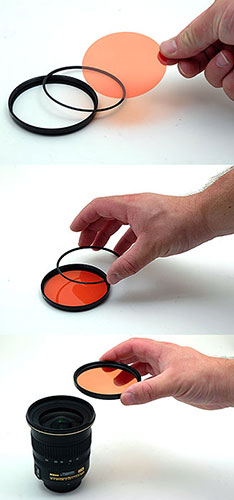
We now have a stock of some secondhand empty 77mm filter mounts available and we can send you one with your filters if you need it. They cost £15 including postage (please make a note of this with your order). You will only need one filter holder with a pack of three Magic 77s! The filter holder is made up of two rings, it is also possible to hold the magic filter in place on the front of the lens using only the thin internal ring from the filter holder directly on the lens.
There is more information on fitting filters in the tips section of this website. The Tips & Techniques section also contains detailed information on how to shoot with the Magic Filter.
[More
info on the Magic filter] [Buy
the Magic filter]The GreenWater Magic filter is available in 6 different sizes of optical quality polyester gels. All our GreenWater filters are pre-packed as singles or three packs, and we recommend 3 packs for travelling photographers in case you damage or loose a filter in the field.
This video of the Exploding Lobster was shot by Peter Rowlands with the GreenWater Magic filter.
How to shoot with the filters?
The GreenWater Magic filter is our most technical product and requires more application from the user than our other filters to get the best results. The detailed advice below should give you a better idea of what to expect from this filter. Ambient light photography requires a different approach to shooting with strobes, and even experienced photographers may take several dives to get used to it. The most important point is to shoot with the ambient light to get even lighting and good colours.
Manual White Balance
Setting your camera’s white balance (WB) manually is a crucial part of the technique for shooting with Magic filters, and is particularly important for the Greenwater Magic. The filters are specifically designed to work with the characteristics of your camera’s WB. You should fully familiarise yourself with the technique for manually setting WB, so it becomes second nature during a dive.
We strongly recommend that you set the WB for each subject that you photograph with the Greenwater Magic, and at least each time your change depth by more than a metre. Generally you can set the WB on the subject, making sure that you fill the frame with a fully illuminated and neutral coloured area (avoiding strongly coloured marine life or open water). If you want you can use a grey card or white slate (depending on your camera), but we have found these unnecessary.
Depth Range
The Greenwater Magic filter is effective over a wide depth range from 5m (15ft) down to 25m (80ft). If you plan to shoot only above 5m (15ft) then we recommend not using the filter and only using manual WB as outlined above. Below this depth manual WB alone may work, but the combination of the filter and manual WB will give superior results as it effects the balance of colours collected by the camera’s sensor, rather than merely how these data are processed.
Reading the Light
The most important factor for successful filter shots is using the ambient light to illuminate your subject, First look up towards the surface and note then direction of the sunlight. Then position yourself so that the light comes from behind you and fully illuminates the subject. A slightly downward camera angle is also useful to ensure even illumination. In green waters ambient light can be very diffuse, often giving you more flexibility of shooting angles.
Subject Selection
The slow shutter speeds required for ambient light photography in green waters make certain subjects more suitable for this technique that others. Fast moving marine life, such as fish and seals, are less suitable. But the technique is excellent for photos of wrecks, divers, scenery, and slow moving marine life.
RAW + JPG
During the development of the Greenwater Magic filter we have noticed that RAW and JPG files (taken simultaneously) can look a little different and sometimes the JPG can look more pleasing. Surprisingly we have not been able to exactly match the look of the JPG files using Adobe Camera Raw to adjust the RAW files. We attribute this difference to additional processing applied to the JPG files in the camera. We can match them using the fine control in Photoshop, and we expect that we could in the manufacturer’s RAW converters.
Anyway, we recommend that you shoot RAW + JPG with the Greenwater Magic filter so that you can use the JPG files should you prefer them.
Noise Reduction
High ISO shooting in low light will produce noise in your digital images. So it is worth switching on any in-camera noise reduction, or applying noise reduction in the RAW Converter or by using a Photoshop plug-in like Noise Ninja.
Fluorescence
Filter photography highlights the natural fluorescence of marine life. Fluorescence occurs when a subject emits light at a different wavelength to the light shining on it. Underwater green and blue light excites fluorescence in a variety of marine life from corals to algae, which emit orange, yellow, green and red light. Normally this light is hard to see because it is swamped by the ambient light reflect by the subject. However, filters act as a barrier to the ambient light revealing this natural fluorescence. In green waters you may see algae appearing red and cup corals fluorescing many colours.
Post Processing
The Greenwater Magic filter produces very pleasing colours direct from the camera and you will see these underwater while you are diving. The filter does tend to remove some green from the water too, producing more blue-ish water colours. Some photographers prefer this look, but if you don’t you can easily adjust the water colour in Photoshop using the Selective Color tool. You can green up the water colour by adding cyan and yellow, and removing magenta from the cyan, blue and neutral channels. We have not made this adjustment to the images you see in this brochure and on the website, but we mention it so you know it is possible.
Fitting filters
Magic filters were originally designed as rear mounted filters because many DSLR wide angle lenses, popular in underwater photography, have specific filter slots on them for gel filters. A few wide-angle zooms do not have these filter holders so we also produce the Magic Filter as a 77mm diameter front of lens filter. The Magic M77 is also large enough to be cut by the user for a variety of other lenses. There are more details on which filter is the right one for your lens on the buy page. For compact cameras we supply the filter in 50x50mm squares, so that the user can cut the filter to fit their camera. For some cameras a single sheet may provide enough material for four or more filters.
When fitting filters only handle them by the edges to avoid getting fingerprints on the centre (see below, left). Rear filter holders are designed for gel filters and will hold the filter securely in place. The Nikon 16mm lens is unusual and the Magic 16N should be placed in the removable bayonet filter holder, on the back of the lens (below, right, note the filters in these photos are the original Magic).
The Magic 77 fits on the front of the lens. This filter should be placed between your dioptre lens and the front element of the lens (below left). If you do not use a dioptre then the Magic 77 can be held in place with a standard UV filter. Alternately you can mount the dioptre is an empty filter mount (below, right).
We now have a stock of some secondhand empty 77mm filter mounts available and we can send you one with your filters if you need it. They cost £15 including postage (please make a note of this with your order). You will only need one filter holder with a pack of three Magic 77s! The filter holder is made up of two rings, it is also possible to hold the magic filter in place on the front of the lens using only the thin internal ring from the filter holder directly on the lens.
There is more information on fitting filters in the tips section of this website. The Tips & Techniques section also contains detailed information on how to shoot with the Magic Filter.
[About Magic] [Magic Galleries] [FAQ] [Tips & Techniques] [Contact/Dealers]
[Auto-Magic filter] [original Magic filter] [Greenwater Magic filter] [Instructional DVD] [Online Store]